About Me

My photo
Paige, 20, psychology student and beauty enthusiast. Naturally resemble a chicken nugget, use makeup to disguise myself as a regular person. If you'd like to contact me, my blog email is jabbatofabba@gmail.com
Showing posts with label jabbatofabba. Show all posts

Monday, 31 October 2016

Holy Grail Foundation - Too Faced Born This Way

For so long I said 'you know what? I don't need a high end foundation, drugstore foundation works for me and I'd rather spend my money on other things'. I'm here to tell you that I was so very, very wrong and that Too Faced have shown me the error of my ways.


Since starting my job I've spent entire shifts looking longingly at all of the beauty counters and their offerings, whilst promising myself that I don't need a new base, that I'm good with my trusty Rimmel. Then one day I bit the bullet and asked the lovely lady who worked for Too Faced to match me up. I was originally torn by that and the Bareminerals Serum foundation, but the promise of long-lasting medium to full coverage for a similar price won me over.

As she applied a primer (the Laura Geller alternative to the Hangover Primer which she didn't have to hand) she promised me that dry skin patches would be a thing of the past with this foundation, and I didn't believe her for a minute. There was no way that an oil free full coverage foundation wouldn't make my already dry skin look dry.

I was proven wrong, even after applying it with over my Seventeen Skin Wow 3 Way Highlighting Primer (which I may come back to in another post, hint hint) which can by the teeniest bit drying.

On the website, Too Faced claims:

  • ''Medium-to-full undetectable coverage
  • Oil-free
  • Coconut Water helps delicately replenish skin’s moisture levels without overhydrating—for the look of radiant skin
  • Infused with the resilient Alpine Rose to brighten the skin’s appearance and promote elasticity
  • Hyaluronic Acid helps balance skin for a smoother, more youthful appearance'

My skin looks F L A W L E S S after application, and you really don't need a lot to achieve that look. It doesn't crease under eyes, and it sets to a pretty much matte finish. I am so in love with this foundation, I feel like a changed woman. Yes, £29 is a lot for a foundation, but if like me you like to have a bit more coverage sometimes, for example on nights out, and you want it to last, then this is for you. When I say it lasts, I really mean it lasts. There's a nightclub where I live which stays open til 5am, and it is literally a sauna in there. My foundation remained flawless until after I left the club and physically took it off with a cleanser. For those of you who know which place I mean, that's a victory and a half.

Even the packaging is lovely. It feels luxurious (which it should, for the price!). The shade range in the store I bought it from was lacking somewhat. The shades were all on the yellow toned side, and the lady told me the shade I got (porcelain, the lightest shade they stocked) was more on the pink side, but it is still a little bit yellow on my to be honest. It's not too bad though, and I can forgive it as it looks so lovely when applied despite the undertone. The Debenhams website has a lot more shades - 18 I think-  ranging from pale to dark skin tones though, so they are trying to cater for all.

I've thrown in a classic half-face photo so you can clearly see the level of coverage from just a light layer. I used under half a pump for this but it's definitely buildable to full coverage. Unfortunately I decided to take the photos at night as I'm going away for the week but wanted to get this post up anyway so the photos aren't great thanks to the abysmal lighting in my house but hopefully you can see the effects anyway.
Before and after using half a pump of the foundation. While the photos aren't great you can see it as evened out my skin tone and covered any redness and blemishes, although not my pesky moles.

A very awkward and bad photo taken outside my bedroom where the lighting is slightly better. You can definitely see the difference though.


For effect I'm adding in a few photos that I took on Saturday night for a Halloween look I did. The foundation photographs beautifully and lasted throughout the night.


This is the first Two Faced product I've ever purchased but I've definitely got my eye on a few (or maybe more) other products, including the Christmas sets (no, Paige, you don't need more
eyeshadow palettes!)


Any Two Faced products you recommend? Have you tried this foundation?

See you again soon!

Paige

Saturday, 13 August 2016

Reading Fest 2016 Packing and Makeup!

I've never been to a festival before, so of course I've done so much research concerning what to pack and what makeup is best, and I thought I'd pass on the info I've collected onto any of you who might be interested!

Clothes

While the festival might only be for 3 days but my friends and I got early entry passes so we'll be there from the wednesday til monday, which means I'm gonna need way more stuff, so I've had to plan my outfits carefully to reduce the amount of stuff I'm gonna have to carry.

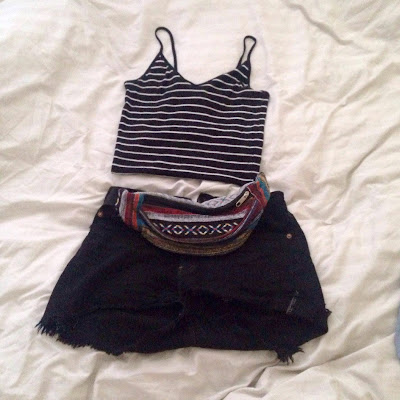
A staple piece that I'm bringing is a pair of Levi's recycled black high waisted (not sure if they're meant to be high waisted but I'm 4'10 so I have no torso) shorts that I bought from Urban Outfitters in the sale. They no longer have them on the website but they still have the blue denim version here - Urban Renewal Vintage Originals Blue Raw Edge Levi's Shorts - £36. They were meant to be £36 but were reduced to £10 in the sale, and then I got 10% student discount to make them £9! They're so comfy, and because they're black I can wear them with pretty much any top, and with tights underneath if it's too cold for bare legs.

Photo from www.urbanoutfitters.co.uk
Black Levi Shorts

I then have a bunch of different crop tops that I can pair with the shorts to make simple outfits.

Blue crop top from Zara

Stripey black and white top from Primark

As stand alone items I have a floral dress (super old from H&M), and a floral playsuit from Boohoo that can be found here.
Boohoo Bell Sleeve Playsuit - photo from www.boohoo.co.uk

I'm also going to take an old pair of jeans. I know everyone says not to take jeans but I have some really comfy old ones that I'll happily burn afterwards, it could get cold and I'll be the one laughing when I have toasty denim covered legs. I'll wear them on the train there as they'll be the heaviest clothing item so I don't have to carry them. Going with the theme of old bottoms - leggings. Comfy, versatile, comfy, cheap and comfy. Wear them outside, wear them in the tent when it's too cold for one layer. I'm going to steal one of my boyfriend's hoodies that I can wear to keep warm or to use as a makeshift pillow (thanks Adam). Also many pairs of socks, I hate cold feet, and in wellies you need some nice thick socks so you don't get blisters. One thing I don't have yet but need to get is a waterproof coat/rain mac.

Speaking of wellies, lets get onto shoes. When I first looked at the weather, it said that during Reading it would be pure sunshine and rainbows. Now the weather is apparently leaning towards showers and thunder, which is ideal if you hate life. So, I'll be opting for a classing pair of wellies, which I'm borrowing from my mum (lol) because she has a snazzy pair of green Joules wellies, something like these.

photo of the snazzy wellies from https://www.shoetique.co.uk/

 In case the rain subsides for a while and the grass is dry, then I'll be opting for a pair of these converse-style low tops from New Look that I've had for ages and are wrecked already, so I won't mind binning them afterwards. Yes, they're on the teens section from New Look, and yes, I'm a 20 year old with feet smaller than my 10 year old sister. (I'm a size 2 for those of you who are interested - it's cute but try getting nice heels).

Mine are exactly the same as these but covered in grey/black smudges.
Photo from www.newlook.co.uk

And last but not least, it wouldn't be a festival without a bumbag! Found this beauty on the Skegness market for a fiver, what a treat.

#BringBackBumBags


Toiletries

While some people might be able to embrace the filth and enjoy being muddy for 5 days, I just dont think I can do it. So, I'm bringing a little travel bag with the essentials. I got a little set of travel bottles from Primark to decant things into. I have:

- Shower Gel (Superdrug)
- Shampoo (Wilkinsons Passionfruit and Green tea)
- Conditioner (same as shampoo)
- Facial Cleaner (Simple Kind To Skin Moisturising Facial Wash)
- Toner (Simple Kind To Skin Soothing Facial Toner)

Mini travel set in the bag from Primark (£1)
Extra spray bottle for toner from Wilko (50p)

- Toothpaste (Whitening toothpaste from Primark)
- Toothbrush (obvs)
- Disposable razor
- Moisturiser (Talika Photo Hydra Day)
- Serum (Superdrug Simply Pure Hydrating Serum)
- Hairox Hair Brush
- SPF 15 from Ladival
This looks like a lot but I'm guessing my skin is gonna need all the help it can get.
I'm also taking paracetamol (hangovers suck), my contraceptive pill, some tampons (be prepared for anything), and spare toilet roll, as well as hair bobbles and sun glasses.

Make-up
The best part. I know that by day 2 I'm gonna be too tired to care what my face looks like, but that doesn't mean I won't do it. I know I won't want to spend forever on something that I also have to maintain throughout the day however, so I'm going for simple with minimal products but still bright and festival themed. I'm also taking stuff that I'm not scared to lose or break because it can and will happen, so the naked palette is staying at home!

Base products
Primer - Freedom Pro Mattifying: it could get very hot and I don't want to sweat my makeup off so this will ensure that doesn't happen.
Eye Primer - Freedom Pro Eye Primer (you need this for glitter eyeliner)
Foundation - I've used a mix of the Caudalie Vinoperfect Broad Spectrum SPF15 Day Perfecting Fluid (which minimises pores and corrects skin tone to create a flawless and radiant but natural looking finish) with the GOSH Foundation Plus+ to add a little coverage and darken the Caudalie product which is a little too light for my skin.
Concealer - Collection Lasting Perfection: those eyebags are gonna be huge
Powder - Makeup Revolution Radiant Light Powder in Breathe - mattifying but still pretty and glowy

Brows
My brows are a hairy mess right now so I went with Benefit's Goof Proof brow pencil to attempt to define and fill, and then Primark's £1 brow gel to set them.

Contour/Blush/Highlight
All done with the MUR Ultra Sculpt and Contour kit in Ultra Fair. Sprayed my RT Fan brush with toner to intensify the pigment of the highlighter.

Eyes 
- Set the primer with a light base powder, then used a mid-toned brown to deepen the crease slightly. Can use the contour palette and face powder for this if you're planning to bring less makeup.
- GOLD GLITTER EYELINER (yes I'm excited about this part). I bought a cheap one from poundland so it's a bit more work but layer up until you're happy with your wing. Do it thicker than you would your regular black liner. I found that it was easier to use a shimmery gold eyeshadow as a base to get a more opaque line with the glitter.
- Black liquid liner - applied over the top but a thinner line than the gold
- Black WATERPROOF mascara - pls do use waterproof unless you like being a panda, in which case use whatever you like. I used the Icona Milano Emotion Allowed mascara.
- smoke the lower lash line out a little using a brown shadow
- highlight the browbone and inner corner

Lips
Basically use whatever works for you! I'm going bright lips here because I rarely use bright lipsticks, so what better time to experiment. In the photos I've used Freedom Pro Melts in No Heroes (a deep pink colour) and then an I Heart Makeup Lip Lava in Tremor which is a lighter pink. I'll also probably go with a nude lipstick too just for easy upkeep.


It was really hard to get a close up of the glitter eyeliner as I don't have a fancy camera but you can kind of see it! 

After taking the photos with the Freedom Pro Melts and changing the lip colour I also threw caution to the wind and used the glitter as a highlight too, and I think it looks pretty cool! I threw my wild hair in some space buns which looked pretty cute and that was the finished look!

Glitter on your whole face is the best and only way.

I'm obviously going to take food, drinks, a tent, a sleeping bag, money, my ticket and my ID. I'm also taking powerbanks for some sneaky on the go phone charging.

Gosh this post was long! It's probably too much but I had a lot to say! Hope you enjoyed it anyway.

See you again soon!

Paige x


Tuesday, 19 July 2016

Setting Spray Suggestions!

I don't know about other parts of the world, but right now in the UK it's absolutely boiling! This means that if you're like me and you can't not wear makeup even in the scorching weather, then you need to be prepared, or anything you put on your face will melt off in a matter of minutes, especially if you're going to be moving around. This is also helpful for those of you who like to go out in the evenings - makeup and sweaty clubs don't go together too well unless you're willing to put the time and effort in to complete the necessary steps. I'm going to talk about primers when I''ve finished trying out all the ones I currently own, but for now I'm going to talk about the last step - setting spray. Not only does setting spray help your makeup last, I also use it to dampen brushes for stronger shadow and highlight!

My makeup routine has inevitably had to change to suit the weather (let me know if you want an updated makeup routine post!) but one thing that hasn't changed is needing a setting spray. While I have really dry skin, I get quite an oily t-zone, particularly if it's warmer. When I worked in Superdrug I had a lot of people ask me to recommend them one, so I'm going to tell you all what I told them.

Hands down THE BEST setting spray I've ever used is the Urban Decay All Nighter setting spray. I received a little travel bottle of the stuff and Urban Decay my Lord and Saviour did it again. It made my makeup stick to my face and last for hours longer than it would have without setting it. Holy grail product right there. Unfortunately, my love affair with the UD setting spray came to an abrupt end, when I ran out of the product, and realised that it was £22 to purchase the full size 120ml bottle. My bank account said no, even though my heart was saying yes yes yes do it buy it plssss. So, I went on the search of a good and cheap(er) setting spray.
Photo by Urban Decay (http://www.urbandecay.co.uk/) - Urban Decay Setting Spray
The first I came upon in Superdrug was the Makeup Revolution Setting Spray. The bottle's big, in fact you get 100ml for £5! Unfortunately my excitement didn't last long. I love Makeup Revolution and I really wanted to like this, but it just didn't do anything for me. I was so disappointed, I've heard so many people say they like this product, but for me it just kind of felt like spraying water on my face, without any improved staying power for my makeup. So sorry Makeup Revolution, I love you, I just didn't get on with it. Maybe it's just my skin? Who knows. Have you tried it?
Photo by Superdrug (http://www.superdrug.com/) MUR Pro Fix

The other two alternatives are Freedom and Makeup Academy, and I have to say both were pretty on par with eachother. Again, both the Pro-Fixing spray from Freedom and the Pro-Base Mattifying Fixing mist were £5 for 100ml of product, and these ones were definitely worth the money. While the staying power wasn't as good as the UD setting spray, who's going to complain for such a huge saving?
Photo by Superdrug (http://www.superdrug.com/) Freedom Spray  
Photo by Superdrug (http://www.superdrug.com/) MUA Spray

There are other notable setting sprays that I'm yet to try:

- L'oreal Infallible Fixing mist
- NYX Dewy Finish Setting spray
- Maybelline Superstay 24hr spray
- Evian Facial Spray (apparently!)

And of course the MAC Fix+ which I am desperate to get my hands on!

I've linked to the Superdrug website for the drugstore sprays, and makeup's all 3 for 2 at the minute there so you can treat yourself!

Is there a setting spray you've tried that you'd recommend? Have you tried the MUR and did you like it? I'd love to know.

It has been a little over a week, I was in a little bit of a blogging rut but I'm hoping to be posting more often now!

See you again soon (hopefully!)

Paige x


Monday, 11 July 2016

July Glossybox! Updated (mascara mix up)

The postman literally just delivered my Glossybox and I really wanted to write about it this month. All the excitement of getting a kitten has kept me busy and I haven't made a post since my I Heart Makeup Giveaway (still open til the 14th of July by the way!) so I decided to jump in and get writing while she's fast asleep - and looking as adorable as ever.

First of all, I love the way the Glossyboxes are packaged, they always look so chic and it's like getting a present once a month!


The theme is Summer, and the first product I picked up out of the box is all about that. It's the Utan & Tone Nourishing Night Cream (RRP £12.50). It's a clear and odourless night cream that gives a gradual tan overnight! I'm super excited about this product because I'm currently using the Garnier Summer Body gradual tanner but I don't like using it on my face because I have really sensitive dry skin, especially on my face, so I think this will be ideal for tanning my face without drying out the skin, as it contains hyaluronic acid, vitamins and anti-oxidants, and while I'm not an expert on skincare, those ingredients are supposedly hydrating and good for skin repair so it sounds great to me! 

The next product in the box is the Soft & Gentle Hair Minimise Anti Perspirant (RRP £2.99), which while being a regular anti-perspirant is supposed to also reduce hair growth, through the inclusion of something called Keliosoft. Looking forward to seeing the effects of this, because (and I know I can't be the only one) I hate having to shave every day, it's such a chore, so if this helps then I'm all for it, especially as it's so affordable.

Then I picked up the Collection Supersized Fat Lash mascara (£2.99). I didn't receive any information on this as on the little leaflet you get with the box it actually says I should've received the Icona Milano waterproof mascara (which if I'm honest I would've preferred because my eyes are so bloody sensitive, the slightest thing sets them off and then my eye makeup is all over my face), but I have contacted Glossybox so hopefully I'll find out why I received the wrong product. I'm not sure what to expect with this mascara. It claims to be volumising but from looking at the wand I'm expecting to get more length than volume, but I'll give it a go anyway and get back to you!


The penultimate product in the box is the Hairon De-tangle Brush (RRP £6.99), which is designed to detangle wet hair without breakage. I have quite brittle and breakable hair, so hopefully this might help. It looks suspiciously like the tangle teaser, but I never got round to purchasing that so I'll get loads of use out of this product. I love the pastel blue colour of it as well.

Lastly, and potentially the item I was most excited to receive, is the Blank Canvas F20 Flat Bush (RRP £11.95). Just from looking at it I feel like it will be my new favourite brush for applying foundation. The brush feels really nice and heavy, so it just feels more sturdy. The super soft dense synthetic fibres supposedly give a 'flawless HD finish' and that's what I want from my foundation, I'm sure you'll hear more about this once I've tried it.


Glossybox is £10.00 plus p+p, so it's really good value for money, and for someone like me who loves trying different products, its a great way to try a variety.

Any of these catch your eye?

See you again soon,

Paige x

UPDATE - 26/07/2016

After a few back-and-forth emails with Glossybox concerning my unboxed hairox brush and incorrect mascara (or product card as they claimed), they finally sent me the Icona Milano mascara (which I absolutely love for daytime fluttery lashes!), and a new brush in its box this time (my original hairox brush wasn't boxed) and although  the box it came in was battered I can't blame Glossybox as that's more likely due to the courier.
They also sent me the Talika Photo-Hydra day moisturiser (30ml), which is a beautifully light weight but rich moisturiser (retailing for £25 on the Glossybox website) that I'm loving, as an extra little gift to apologise for the mix up. It might have taken a little while but overall I'm happy with how it was handled and I will be continuing my subscription because I love the variety of products!

Wednesday, 6 July 2016

I Heart Makeup Purchases and Giveaway!

If you read my post on Makeup Revolution, you'll know that I'm pretty much in love with the brand (don't tell my boyfriend), so if that's anything to go by I was bound to love the I Heart Makeup range. As expected, I've got nothing but love for the products I bought. The ones I chose were those that are pretty much dupes of Too Faced products, those that I like to admire from afar but can't justify spending the money on. I'll try to show comparisons of the Too Faced and I Heart Makeup products, but I don't own the Too Faced alternatives so I won't be able to swatch them. You can easily source them yourself with a quick google search as these are quite well known dupes!


First and foremost, the I Heart Chocolate palette, which is an almost direct dupe of the Too Faced Chocolate Bar palette. This was the product I was most excited to get out of the range. I adore the packaging, the melted chocolate bar is so cute, and I actually kind of prefer it to the Too Faced one for that alone! Then there's the price difference, it was only £7.99! For that price, the quality of the sturdy packaging and pigmented shadows is unbelievable. While I can't compare the pigmentation to the Too Faced one, I can tell you that these are very pigmented, very buttery and easy to blend. Such incredible quality! I will 100% purchase more of the Chocolate palettes as there's a few more from I Heart Makeup, and I might try a few of their others too. I've been reaching for this non-stop since I bought it.

Just look at the packaging! So cute.

Such pretty shades. Unfortunately the shimmers aren't picking up in this photos but there are some beautiful gold and pink shimmers, as well as some more brown toned ones. If you want a more clear photo then try the product page on MUR's website.

Another product that I was VERY excited to try was the Blushing Hearts Triple Baked Blusher in Candy Queen of Hearts, £4.99. This is a dupe of the Too Faced Sweetheart Blush and it's beautiful. The packaging is adorable, and the blush itself is made up of three shades that can be used separately or together if you swirl a brush in the blusher. It's very pigmented so use a light hand for sure, and it's also shimmery so you could use it alone or very lightly over a matte blusher for a pretty glow. It's bloody beautiful, honestly. Again, I've been reaching for this pretty much every day, and also it just looks pretty in my makeup drawer.

So cute!

Last, but not least, the Lip Lavas. I've lusted after the Too Faced Melted Lipsticks for so long, yet I've never been able to justify purchasing them. Then I spotted these bad boys, and I'm so glad I did.


They come in five shades, and there's an option to purchase all 5 on the Superdrug website at a discounted price. 

Left to right - Forgiven, Tremor, Unleash, Shockwave and Firestorm.


All of the shades are bright and glossy, and last for quite a while, but wear down really nicely, leaving a pretty but faded version of the shade on the lips. They aren't matte so do transfter, but are quite moisturising and for £2.99 each you really can't complain!
  • Forgiven is a beautiful nude pinky-brown, very wearable and on trend for summer. 
  • Tremor is a very pretty pink which I didn't think would suit me but I stand corrected. It's supposedly a dupe for the TF shade 'Peony', and again it's very wearable. 
  • Unleash is a vibrant peachy-orange shade.
  • Shockwave is an intense light purple shade, which I liked more than I expected to.
  • Firestorm is a b e a utiful deep red shade
The product is squeezed out of the tube onto the sponge applicator on the top of the tube and can be applied straight onto the lips, which is really simple and pretty fool proof for those who struggle with applying liquid lipsticks. I loooove these. I love the formula and the gorgeous bright shades which are perfect for summer and festival season (I know they will be coming with me for Reading festival!)

I have literally nothing bad to say about any of these products. They're all so pretty and I'm so happy that Makeup Revolution are making such good quality makeup at affordable prices, making on trend products so accessible. 

I actually have an extra set of the Lip Lavas, so to win those enter below! The giveaway will open midnight tonight UK time and will be open for a week. Good luck!

Paige x

a Rafflecopter giveaway


Saturday, 2 July 2016

Makeup Revolution Collection!

Anyone who knows me also knows I'm a huge fan of Makeup Revolution, particularly for their eyeshadow palette offerings. The quality of the eyeshadows is spot on, particularly the shimmers. Thanks to the price of them I've been able to afford to buy multiple palettes, which means I tend to reach for them more than my Naked palette, just for the variety. I've also recently bought a few brilliant products from I Heart Makeup range, but I'll talk about those in another post.

A few from my little collection

I'll start with the Redemption Palettes. They're 12 shade palettes, and they're just £4 each! Which is how I justify owning Iconic 1, Iconic 2 and Iconic 3, and will continue using this excuse to justify buying more. The best part is that they're incredible dupes for the Urban Decay Naked Palettes, which are nearer to £40 each. What more could you want? The pigmentation, especially in the shimmer shades, is AMAZING. As with most budget eyeshadow palettes, some of the shades are a bit hit and miss, but honestly I really don't mind at all considering how cheap they are!

Top - Iconic 2, Bottom - Iconic 3

Another dupe that I own is the Iconic Pro palette, a dupe of the Lorac Pro palette and a fraction of the price. This palette also has a nice big mirror in the top, which is great for travelling. It also came with a double ended brush, not those horrendous little foam applicators that I throw out as soon as I spot them. I love the colours in this palette, but I recently dropped it and snapped it in two which left me very upset, but I'm sure I'll end up replacing it at some point, as it's £6 so it doesn't really break the bank. (I also don't have this one with me to photograph but when I get it I'll edit in a photo, sorry!)

One of my more recent eyeshadow palette purchases from Revolution is the Fortune Favours the Brave palette, by BritishBeautyBlogger. This palette deserves a moment of silence while we all admire its magnificence. There are 30 shades, a mix of matte and shimmer, pressed and baked powders and I love it. The pigmentation, range of shades, the marbled effect of some. There's nothing I don't like about it and I will continue to treasure it. It was only £9.99, but I used all my saved up superdrug points and got it for £3.99, which I was obviously ecstatic about, but I'd have happily paid the full price for it as it's 100% worth the money!

I took these photos of the Fortune Favours the Brave palette a while ago, hence the different background. The writing on the front has since worn off unfortunately.

Makeup Revolution are also famous for it's baked highlighters. They're absolutely stunning, and only £3 each! I also purchased the Radiant Lights powder compact in Breathe (£3) the other day, and if I'm honest I thought it was a highlighter, which it can be used for, but I actually have been using it as a face powder. Stay with me here. If you do a heavy swatch, you can see that it can be used as a subtle highlight, but when dusted over my face it set my foundation and left a beautiful natural looking glow that I fell in love with and I've used it every time I've done my makeup since. I did purchase the Pressed Powder a while ago for £2 when I had gone away for the weekend and forgotten my Rimmel one, and actually really liked using it for ages, but I love the radiance that Breathe provides. It's a similar concept to the very sought after and horrendously expensive Hourglass Ambient Lighting powders.

Radiant Lights - Breathe

Another Makeup Revolution product I use every day is the Ultra Sculpt and Contour Kit in Ultra Fair, which I've mentioned before. It's small and travel friendly, and contains both a contour powder and a highlight as well as a pretty light rose gold blush. It's a really simple, quick and easy everyday contour set and I'm a big fan, especially of the highlighter inside. MUR you win with highlighters, congratulations.

Ultra Sculpt and Contour - Fair


I shamefully haven't tried any mascaras from MUR so you'll have to forgive me for that, although I've heard that the Amazing Curl mascara is a cheeky dupe for the Benefit Roller Lash so I might have to give it a go! In terms of eyeliners, I'm very fussy. I have the most sensitive eyes in existence, as soon as I leave the house my eyes water and my eyeliner decides to vacate the premises and instead live all over my entire eyelid, so I'm always on the look out for one that will stay put. Now, I haven't tested this properly yet but I swatched the waterproof liquid eyeliner (£1.50) and it did not budge no matter how much I wet it, so I'm hoping I'm onto a winner here! It's nicely pigmented, but the brush is quite stiff so I don't know how that will affect the application. If felt tip's more your gig, I've heard nothing but praise for the Thick and Thin liner from my friend Megna. She said 'it goes on silky and super pigmented and pretty', and coming from the expert of liquid eyeliners I definitely trust her opinion.


Amazing Eyeliner Waterproof - Black

Lastly, on a whim I added one of the #LIPHUG lipsticks to my online basket in the shade 'Still missing my baby' which is a deep plum shade, and cost £2.50. It's beautiful, glossy and super moisturising. The shape of the bullet makes it a little hard to apply accurately but I think with the help of a lip liner it'd be a winning lip for the cooler months.

#LIPHUG - Still Missing My Baby

Still Missing My Baby
Top - One Swipe
Bottom - Several Swipes

If you haven't tried anything from Makeup Revolution before I sincerely encourage you to do so, for the price of the products you really can't go wrong! I've heard on the grapevine that there are some really exciting products coming soon so look forward to those, I know I am!

Have you tried any Makeup Revolution products that you'd recommend?

Paige x

Sunday, 26 June 2016

Matte Liquid Lipsticks

I'm jumping on the bandwagon a bit here. I've wanted to do a post about matte liquid lipsticks for a while, but I wanted to wait until I had a decent range of them that are easily accessible to UK shoppers, because like many I'm a bit unsure when it comes to purchasing from outside the UK. I've ended up with 6 in my collection so far, each from different brands, but I expect I'll be getting my hands on more soon because I have to say I'm a big fan of matte lips, particularly nudes, and I love the feel of the liquid ones.


Tranquility, MUA LUXE - £3
This is a slightly brown nude shade, which is the shade Tranquility by MUA LUXE, from their Velvet lip lacquer range. The packaging kind of reminds me of the Gerard Cosmetics Hydra Matte lipsticks, with the frosted glass and gold lid. It's a very pretty nude shade. I did find the formula was a teeny bit thin, but still opaque when applied to the lips. As you'd expect with budget liquid lipsticks, I did find this a little drying after an hour or so of wearing, but nothing a little bit of lip balm can't fix. Although I do prep my lips with a scrub and some balm I always find my lips to be a little dry anyway, so I can't blame the lipstick entirely. In terms of longevity, this did need touching up quite a bit, and if you wanted to keep it perfect you might have to remove it and reapply it completely after a few hours, especially after drinking, but for the price you really can't complain.

Tranquility

Stockholm, NYX - £5.50
The next shade is a slightly more peachy toned nude, Stockholm by NYX from their Soft Matte Lip Creams. The colour is beautiful, and I didn't expect one so light to suit me, but I actually find myself reaching for it quite a lot. The little doe foot applicator allows it to be applied precisely and quickly, and I didn't find this one too drying. After maybe 4 hours I wanted to apply some lip balm but it was manageable. Again, it did wear a little once I'd eaten and drank, but as I said before, for the price I'm not complaining. This is one of my favourites, and I'm desperate to get some more of these!

Stockholm 


Birthday Suit, Sleek - £4.99
It wouldn't be a matte liquid lipstick post if I didn't include this bad boy now would it? Every blogger and their dog raves about these and I can see why. They're long lasting, non-drying, and come in beautiful shades. Birthday suit is a pinky nude shade, and it looks beautiful on the lips. It doesn't settle into the lines on your lips, but glides over and ah I love it, and the Matte Me range is less than £5, so it's definitely worth buying! My only niggle with these are the shape of the applicator, which I find makes it a little more difficult to apply, but I can live with that seeing as the product itself is so nice!

You can see from the swatch of Birthday Suit that I struggled to get an even layer due to the really thin applicator but it's slightly easier on the lips.

Nude Flush, Maybelline - £6.99
Now, I have to say this isn't one of my favourites. The shade is amazing, I love the colour and the pigmentation. I didn't think it dried well enough down to a matte on the lips however, and it certainly isn't transfer proof, which means it isn't long lasting. That being said, I've seen quite a few reviews from people who said they absolutely loved this, so maybe I'm just doing it wrong? I'm swatching them all as I go along, and by the time I've looked back at each shade so I can remind myself of the colour etc, they've all been at least partially matte, whereas this one just isn't doing it for me. Sorry Maybelline, I still love you.

Nude Flush - Maybelline.
 I waited to see if this would dry matte to take another photo of the swatch but it still hadn't dried.


Just in Love 335, Max Factor - £10.99
Slightly pricier than the others I've mentioned but the Max Factor Lipfinity Longwear Lipsticks are well worth the money. I started a shift at work not long ago and swatched one of these just to see what they're like, and that evening the swatch was still pristine, despite me working, washing my hands, and even rubbing off other swatches with makeup wipes! Longlasting doesn't even cover it, but while it means they take a while to remove, you can apply it and not have to worry about it all day long. They even give you a lip balm in the set to apply throughout the day to alleviate dryness should it occur but I don't find this one to be too drying either. The shade I have is a kind of bright pink shade but I actually really like it on the lips. Also, as weird as it sounds, the doe foot applicator is really soft, so I really enjoy applying it!

Just in Love - Max Factor


Hot Brownie, Essence - £2.30
Last but not least, The Velvet Matte liquid lipstick from Essence in Wilkinsons. I picked this up on a bit of a whim, because not only did I love the look of the deep plum/red shade, the scent is beyond delicious. Some people aren't a fan of that fake vanilla kind of scent but I love it, although the scent doesn't transfer to the lips, so if that would put you off, don't let it worry you. Again, it doesn't dry completely matte so it isn't transfer proof, nor is it long lasting, but for £2.30 it's a nice lipstick, I just wouldn't say it was a matte one.

Hot Brownie - Essence
You can see where it smudged a little because it doesn't dry down completely matte.

I'm hoping to try more high end ones soon, maybe some of the popular US offerings like Jeffree Star, Colourpop and Kat Von D, so look out for those in the future. Also apologies for the swatches, I'm still figuring out the best way to do those. Hope you enjoyed this. I've got some nice little posts on the way so I'll see you again soon.

Paige.

Shoutout to Adam for fixing my laptop by taking it apart and putting toilet paper and sellotape inside it, lets hope it doesn't set me on fire. xo

Monday, 20 June 2016

My most used Make-up Brushes!

With my makeup fanaticism, comes my obsession with makeup brushes. So, I thought I'd tell you what my favourites and recommendations are. To be honest, my collection mostly consists of the Real Techniques collection, but I do have the Bold Metals, a few MAC brushes, and then a few randoms that I've picked up along the way. If you're just getting started with brushes, I'd fully recommend the Real Techniques kits, as they contain everything you could need to get started!

A few of the gorgeous brushes from the Bold Metals Collection.


Foundation and Concealer brushes, and the B. blending sponge.


Foundation/Concealer

For foundation I tend to use a nice dense buffing type brush, like the RT buffing brush from the Core collection. I really like the coverage this brush gives, as it's good for medium coverage. I would like to try their Expert Face brush, but with the amount of brushes I own I really don't need another foundation brush. I also like using the RT sculpting brush. I got this in the contour set, but I don't really rate it for contour because it's so wide, but it's surprisingly nice for foundation due to the density of it.  

Concealer

If I'm using a separate brush for concealer, which I don't always do because I'm too lazy, I use the Primark stippling brush. It's actually really good quality for something like £1/£1.50. It's soft and blends both foundation and concealer really nicely, but as it's small I tend to use it for concealer.

Blending sponges

I've tried a few blending sponges. My all time favourite was the original Beauty Blender, but the price tag (£16.00) is too high for me to justify repurchasing it. Now I use the RT complexion sponge (£5.99), or the B. makeup sponge from Superdrug (£4.99 but £3.32 until 28/06) if I'm only using it to make sure my foundation is completely blended.

Finishing Brush 

My all time favourite powder brush is the RT Bold Metals Arched Powder brush in 100, shown in the first picture. It's the softest thing I've ever blessed my face with, and doesn't pick up too much powder so I can get such a light dusting of powder which prevents caking. Plus it looks gorgeous in general. 

Blush Brush

The RT Bold Metals collection gets a shoutout again here, with their Tapered Blush brush in 300. Rose gold packaging is a winner either way, but the brush itself is again incredibly soft, and it's the perfect size for popping blusher on the apples of my cheeks. You can see this too in the first photo.


Eyeshadow Brushes and Eyeshadow Blending


Eyeshadow 

This is a difficult one for me. I have quite a few eyeshadow brushes now, but a few brushes stand out for me for general application. 
- RT Bold Metals Oval Shadow 200: a really big fluffy brush, perfect for those single eyeshadow days. Again, beautiful to look at.
- The bigger, fluffier side of the brush from my Naked palette. Really like it for packing eyeshadow onto the lid.
- RT deluxe crease brush: again, great for packing on eyeshadow, and I particularly favour this one for applying cream shadow bases. 
- MAC 213 brush. Fluffy, soft, slightly dense, lovely application. 

I also own the Eco Tools Eye Enhancing Duo, which contains 2 double ended brushes. One of the brushes has a blending brush on one end and a smudging brush on the other. The second brush of the set has a fluffy brush on one end and an angled liner on the other. It's a really good all round set, and the brushes are good quality and super soft, so I use these a lot too.

Eyeshadow Blending 

I've only recently really gotten into eyeshadow blending properly, so I haven't really invested in blending brushes, but I have 2 favourites for this so far. My favourite for crease blending and application is the MAC 226 - I find blending so easily with this brush! The other is a MAC brush, but I don't know exactly what it is, because it's a tiny brush that came in an eyeshadow palette from MAC. I think it's the 217, but I can't be sure.

Brow Brush

I've been using the RT Bold Metals 202 brush, which is an Angled Liner brush, but it's so small and thin that it makes it super easy to get really natural hair like strokes for my brows. This is the silver brush on the far right in the first photograph. 

Contour Brush

In terms of contour, I'm not much of a pro. I tend to stick to using small blush/bronzer brushes, such as the MAC 116, but I do sometimes use the RT Bold Metals Flat Contour brush.


RT Fan Brush and Setting Brush

Highlighting

My all time favourite highlighting brush is my RT fan brush, I just love the finish it leaves on my cheekbones, it's lovely and soft. It's a pretty brush. No complaints at all. I do sometimes use the setting brush from the same collection, as it's a small, fluffy brush that can be used to create a beautiful glow.


Like I said at the beginning, it really isn't essential to own a load of brushes, I just like to experiment and find which I like for application, and you might not like some of them that I do. Are there any that you recommend? 

The next post will be about liquid lipsticks so keep your eyes peeled for that! 

See you soon!

Monday, 13 June 2016

How To Use: Sleek Cream Contour Kit

After I posted the Sleek cream contour palette review, people requested that I do a little 'how to' post, with pictures of me applying it. Now, I'm definitely not a pro when it comes to applying my makeup. Neither am I 100% confident in my skills. However I thought I'd be brave and give it a go! 

Some of the products I used for this look, and a treat for editing!

I both cleansed and exfoliated my face, using the B. Men Charcoal Face Scrub from Superdrug, which is technically my boyfriend's but I wanted a nice deep cleanse and it was the best I had to hand. The product itself is branded as a man's face scrub but lets be honest, it's just a decent charcoal scrub, who cares who it's meant to be for. I then applied my Olay Hydration and Radiant Glow moisturiser, which is a nice light moisturiser for summer as it contains SPF 15 and adds some radiance to my skin. 

After I'd given time for that to sink into my skin, I applied my base products. I used the Primark Miracle primer (of course), and then my X-ceptional Wear Makeup Foundation from GOSH, which is good for a light, sheer base (even though you can build it up), and then applied the Maybelline Eraser Eye concealer on my blemishes. 

This is my face with only the base products applied
 I then went in with the contour kit, following the guide that they supply with each palette.


It says on the sheet to use an angled contour brush. I do own the Real Techniques contour brush but I find it a little too large as my face is quite small, so as I said in the last post I use a MAC angled flat foundation brush, which is MAC 193. 

Cream Contours when initially applied

As you can see, my lines and shames really aren't that neat at all, but once you've blended them it doesn't matter. You really don't have to be a pro to apply these! If I can, anyone can.

Cream Contour after blending

I blended all the shades using a damp beauty blender, starting with the light shades and working into the darker shades.

Here I've set the creams with powder

After this, I applied the GOSH Velvet Touch prime 'n' set loose powder over my highlighted areas, and applied a Makeup Revolution contour powder over the top of the cream to set it all in place. I then went ahead and did my eye makeup (taking photos of my eyebrows in the state they were in was almost traumatising). While I did this, the translucent powder worked to both set and lighten the cream highlight. Once the rest of my makeup was done, I brushed away the setting powder and 
applied some blush and my MAC mineralize skinfinish in Lightscapade as a highlight. 


The finished look


This was the finished look! I think it really slims my face, and I just like how it looks. It's a bit nerve wracking to post photos of me actually using the products and I was a little hesitant to post this one, but hopefully you all enjoy it! 

Would you try the cream contouring kit? Let me know if you have and how you found it. 

Paige x